|
Your first beginner ham station antenna: Why you should NOT buy a commercial pre cut dipole antenna or expensive box of aluminum pipe for a vertical - build your own dipole from quality raw materials!
This article is intended to make your first ham station work well by creating an efficient and reliable antenna. The antenna is probably the single most important element of your station. There are a lot of good choices out there for basic entry level transceivers and other items you will need. But connecting even the best radio to a poor compromise antenna will spoil your experience and discourage you.
The first time I heard a station say: "Antenna here is a home brew dipole", I was sort of stunned. But the days when the actual question pool was a closely guarded FCC secret have passed. People DO memorize the material and have limited understanding of the practical application of the test material. I understand that. I am an active W5YI VE, and have happily signed hundreds of certificates. I am not here to bash you for limited understanding of the test material, you have put forth the effort to join the ham radio community. I want you to succeed, and spend your ham budget on antennas that will give you the best signal for the buck, on the first attempt. Most of the antennas described on this page fit on a lot frontage of only 100 feet, if erected diagonally. Even the 160 meter loop fit within that size, squashed a bit into a rectangle, with the multiband dipole run diagonally between two corners. The dipole was in a high tree at the center in an inverted V form. I worked Australia, New Zealand, and Svaalbard using 100 watts with this set up; YOU can have a lot of fun with minimal cash outlay, if you shop smart, for deals on better quality items. Later, if you want a beam or something else, by all means go for it, when you have the experience of listening to other hams who have gotten good results on the air. Here are some tips you will find useful to get the most performance and reliability. Do it yourself for better quality at a lower price.
This site from N3FJP agrees about making your own dipoles, and gives some important tips about optimum height to install your dipoles. https://www.n3fjp.com/antennas/dipoles.html
USE A QUALITY CENTER INSULATOR FOR YOUR DIPOLE
This insulator has all stainless steel hardware that will not loosen and fail. The braid is high quality, and there are good quality lugs joining it to the antenna anchor eyes. There is a drip edge around the bottom that helps keep water out of the coax connector. The anchor on the top is big enough for a substantial rope, and it is not connected to anything inside the center insulator. There are no unnecessary "lightning protection" points to arc at high power if the SWR gets out of hand. I have found nothing that compares in quality at any price. Use electrician's "duct seal" around the outside of the coax connector to keep water out. Duct seal removes easily with a pocket knife later, if need be. Buy duct seal in a "brick" from the big box construction stores like LOWES. Another easy to use product to resist water penetration is self fusing XTreme tape:
https://www.amazon.com/gp/product/B00HWRORX0/ref=ppx_yo_dt_b_search_asin_title?ie=UTF8&psc=1
You can also buy a clear dielectric compound to put INSIDE the mating surfaces of the coax connector for even more protection at DX Engineering.
https://www.dxengineering.com/search/brand/permatex/product-line/permatex-dielectric-grease | 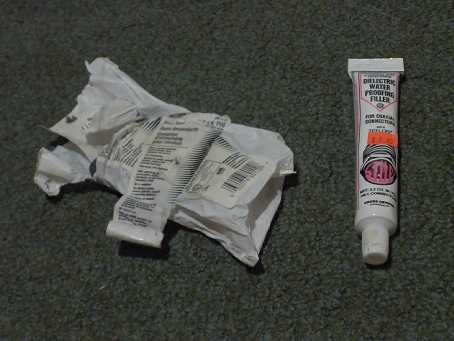 |
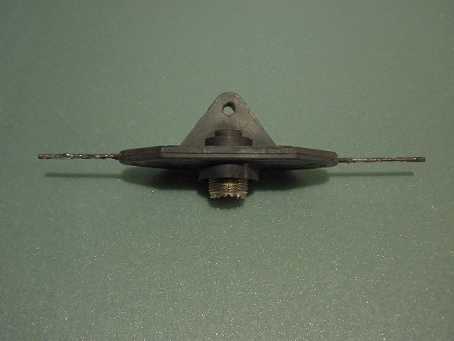
One other center insulator deserves honorable mention, the Budwig. Inexpensive, low loss hard molded plastic. The primary disadvantage is the support hole is too small for rope substantial enough to hold up a heavy feedline such as RG-8/U. The holes for the wires will accommodate big enough wire to hold an antenna. You can work around this by making a small loop of antenna wire to pass the rope through. But is the plastic strong enough in either the support hole or the antenna wire holes for a larger antenna like 80 meters? Try it and see. I had a 40 meter antenna suspended only at the ends (not the center) using a Budwig for a few years, and it did not fail, but I used the lighter RG-8X coax. At least there is not any connection between the hole used to hoist the center of the antenna and the dipole wires. I prefer these Budwig center insulators for shorter antennas between 6 and 15 meter dipoles because the resonance point is stable. There is no braid, which adds an inch of flexible wire that can detune a higher frequency antenna if moved by the wind or otherwise disturbed. At 15 meters and up, an inch variation in length can move resonance 200 or 300 KHz, which is unacceptable. The Budwig does not have that disadvantage, so I favor it over the CQ-801 on those bands. The Budwig also has a drip ring around the coax connector, a plus. I still use the duct seal to prevent moisture incursion into the connector on the RG-8/U, but it is a nice feature. There are no dissimilar metals to corrode, hardware to loosen, or bogus lightning protection devices. Simplicity is elegant. Scrape and tin the solid copper wire antenna connections before assembling to get a good solder joint. Wrap the wires around through the Budwig holes in a small loop, twist them on themselves to form an independent mechanical support for the dipole wires, then solder the ends onto the Budwig copper wire contacts; keep all wiring short, to prevent drift of resonance as described above.
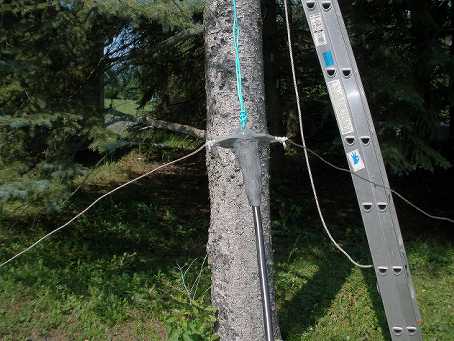
I cannot use rope to support the center because of squirrels; I have to use wire. That is not a problem with either the CQ-801 or the Budwig, since the support hole or eye is not conductive to the antenna wires. The support wire is vertical, parallel to the feed line; it can be attached to the feedline with plastic ties if necessary. If you do have a resonance problem with the support wire, you can use a ferrite clamp on bead to move the resonance away from the operating frequency. For shorter wire antennas, I find the Budwig center insulator quite satisfactory. Here are some photos of it, before and after assembly to my 6 meter dipole.
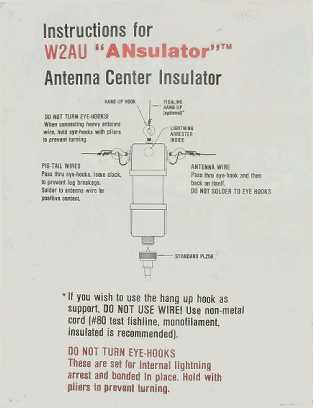
I have used the W2AU ANSULATOR, which is a center insulator, without a balun. It is the exact same mechanical configuration as the unit shown below, the W2AU balun. The braid has a solder lug on it, and corrodes easily from the antenna connection eyes. Mine was crimped, not soldered. That may have changed, but the soldering would have to be done BEFORE the lug was attached to the center insulator assembly, or it would melt the plastic from the heat of soldering. Also, due to dissimilar metals, the braid corrodes eventually, leading to an intermittent connection, which can damage your radio equipment. The worst thing about it is the silly idea of a grounding strap from the coax shield to the upper support eye. If you use wire (not rope) as a support, this will unbalance your dipole. Possibly you could use tin snips to cut the bracket that goes from the bottom to the top to disable this so called feature. There is no drip ring on the bottom, so water can be a problem with the connector. Making it even worse, the antenna wire eyes easily turn, loosening internal connections, and possibly disturbing the setting of a lightning arrestor (so called feature). This feature is not needed, if you bring your coax to a grounding rod, as shown elsewhere on this web page, and short the inner to outer coax connection elsewhere when not transmitting. You do not need this feature at the antenna where water penetration or connection problems are hard to diagnose and fix. This center insulator is in the same price class as the CQ-801, which uses stainless steel hardware and proper connection to the braid.
The Alpha Delta center insulator has a lightning protection feature similar to the W2AU device. Same comments as above. It is very heavy, and needs a substantial vertical support line. Think about suspending a dipole from two uprights at the ends if you want to use this one. An inverted V with a single center support would work fine. I have not tried the Alpha Delta center insulator, but I have had good results from the Alpha Delta coax switches. I assume it is of similar high quality. NOTE: I have removed the arc plug lightning arrestors from my switches, since they arc over when running high power at SWR exceeding 2:1. Keep this in mind if you plan to use an Alpha Delta center insulator on a 75 meter phone band antenna, and force feed it with a tuner for CW operation. You are probably OK at the 100 watt level. The SWR in that case can often run 10:1 in the CW band, unless you take precautions like I describe in my Broadband Bowtie Dipole article. If you are conscientious about grounding and lightning protection, you will not depend on such devices. Obtain the excellent ARRL book on grounding and lightning protection for best results.
DO NOT BELIEVE ALL THE HYPE ABOUT BALUNS
On general principal, I do not use baluns on coax fed antennas, unless there is a specific reason to do so. A dipole does not have a tight radiation pattern, so some distortion of the pattern is not a big deal. Radiation from the coax feedline is not a big deal either, except in specific circumstances. The Carolina Windom by design radiates from the coax feedline as a FEATURE! However, it uses a voltage balun to transition to the high impedance feed point. NEVER, ever use a voltage balun, unless you are willing to tolerate substantial losses and a host of other problems. Try feeding your dipole or loop without one first. A beam antenna manufacturer furnishes a balun specifically designed to keep your gain and pattern on spec; that is a different matter. See the discussion below and W8JI website links. A current balun (Guanella) is the only other balun you should consider.
Some of the balun hype states that not using a balun will cause TVI (television interference). Sorry, that is salesman BS. A voltage balun that is operated at high power or into a high SWR can saturate the core and CAUSE TVI. Nonlinear devices (such as a saturated core) generate harmonics and distortion products.
TROUBLESHOOTING TIP: If you ever notice that when you increase power the SWR increases, investigate. The core in your balun may be saturating, causing harmonics that your clean transmitter is not putting out. Either your balun is screwing up, or there is arcing or failure in your coax or its connectors. A friend called me over to his shack with this problem. He was running hardline the size of my wrist out to a big tower with a remote antenna switch at the base to select various antennas on the stack. With the 100 watt exciter, everything was OK. When he used the amplifier, SWR went bad. I convinced him to let me inspect the remote coax switch; that was not the problem. There was an adapter in the shack to transition from the hardline to a flexible RG-8/U size cable to connect to the tuner and rigs. The adapter (indoors) had visible carbon tracks in it. One of the reasons I favor dielectric grease inside coax connectors, even indoors, for high power installations. Either he accidentally transmitted high power on the wrong band for the selected antenna, or the antenna got a lightning hit, causing the carbon tracks.
If you find RF in the shack, a choke balun made from coax, air wound into a large diameter coil, is the least lossy of all baluns; W8JI tests noted below document that. He also gives good marks to a balun from DX Engineering. It is large and heavy, in a metal box. I do not know how you would mount it at the apex of a wire antenna. It would be great bolted to a beam antenna. I often find the just changing the feedline length will correct that problem, along with any anamolies in the SWR curve that depart from theoretically predicted results. If you have to, the W2DU is a choke balun (beads around the feed coax) that mounts at the feed point; it works well, with minimal losses, since it is not a voltage balun. The W2DU choke balun is much taller than the W2AU balun or ANSULATOR (which are identical mechanically). The data sheet is shown below, which admits to all the deficiencies I describe here. Click on the photos to enlarge it. Unfortunately, the W2DU choke balun shares the mechanical deficiencies of the W2AU balun described here. I have a W2DU which I may use at some point, but maybe a coating of clear non conductive spray paint will extend the life of the braid wires that connect to the dipole element. The W2DU balun does not seem to have the metal strap grounding the top support eye, but the connection may be internal. I would recommend you check it with an ohm meter, if you plan to use anything other than rope to hold the center of the antenna up.
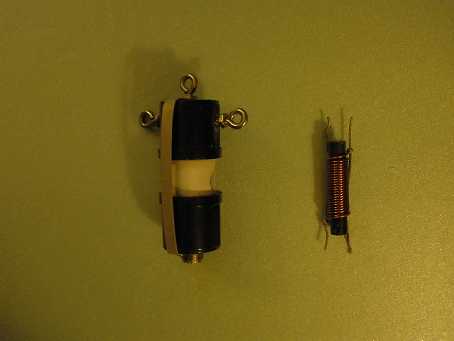
Unless you have a very good reason based on data, a balun often only contributes loss. I disassembled a popular balun, the W2AU, that caught fire, shown in the photos above. The original plastic enclosure was so melted, I had to cut it off in pieces, so it is not shown, but this is the actual core, after I cleaned it up. The core was small for a legal limit balun to be used on 80 meters, and it was a voltage balun. Read the W8JI test data below, do not take my word for it. It had been abused by using it to "force feed" a 75 meter phone band dipole for CW band at high SWR. Even at optimum conditions, a 50 ohm resistive non reactive load, this device would have been working hard to deliver on its promise. This would not have happened if the antenna had been fed directly with coax using the CQ-801 center insulator recommended above. Even a good balun will fail if operated into a high SWR termination. If you must, use a "choke" style balun of coils of coax in air or over a "donut" or a Guanella balun. There is a lot of misinformation on baluns out there. Get the truth at authoritative sites in the links below. Most commercial baluns do not meet basic design criteria. Also keep in mind that the "Carolina Windom" deliberately employs feed line radiation to achieve its performance characteristics. So feedline radiation is not necessarily a bad thing. Some RF in some direction is better than wasted heat due to losses. For a beam antenna with a specified pattern, feedline radiation will distort the pattern and introduce loss of gain you paid so much for. This discussion is targeted at simple dipole antennas. To demonstrate the level of misinformation out there, I have included the discussion debunking the use of steel wool for a balun effect.
USE QUALITY CERAMIC END INSULATORS FOR YOUR DIPOLE
I use ceramic MFJ 16C06 insulators at each support. You probably can use the cheap plastic ones at 100 watts for a while, but I have a linear now, and the cost difference is just not worth the risk of arcing. Use the best stuff and install it ONCE.
I do not understand why people will "save" less than a buck and install these plastic insulators, in a long term antenna installation. For a short term throw away antenna, or a portable antenna where weight is significant, maybe. Here are actual photos of plastic insulators taken down after 5 years on Long Island. These were not exposed to salt water, but it is damp there, and there was a lot of sun. The surface has deteriorated and eroded, exposing rough interior plastic. It is incapable of shedding water, but rather traps it. Significant amounts of power would break it down if it got damp, and even at QRP the loss would make it unuseable. There is a comment on one forum from a ham who was running legal limit AM power, that told of his "economy" plastic dipole end insulators melting and catching fire. If you have any of these in your junk box or on existing antennas, I strongly recommend you replace them with some decent ceramic insulators. Click on the photos below for enlargement.
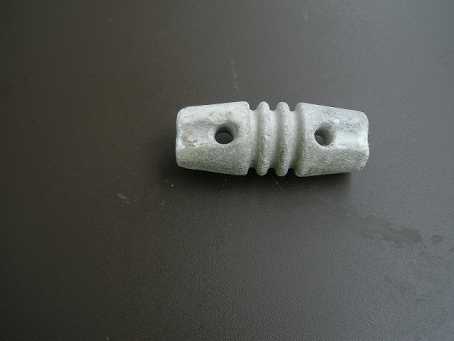
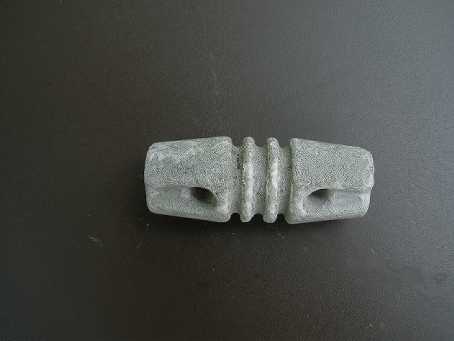
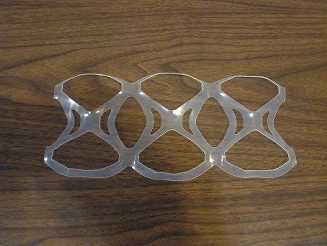
Some high priced commercial antennas come with these plastic insulators shown above. You may be better off using the plastic joiners from six packs of soda or beer cans for end insulators if you are that desperate. I would only recommend the soda can solution for temporary installations, like Field Day, because sunlight may reduce their life. Replace the cheap plastic insulators with MFJ 16C06 insulators or better for long life. At swap meets, buy up older ceramic or glass insulators whenever you can.
Here are some longer style plastic which might work. I have not tried them. Their length definitely will provide improved lower capacitance at the ends, resulting in an antenna that cuts to formula length. The construction on the surface suggests they will handle higher power. But maybe not. The ribs are not rounded, so they may not shed water or snow. The many ribs imply a longer high voltage path, which is good. But click on the photo and look at the one on the left. There is a long flat valley from one end to the other which has no ribbing. If high voltage failure occurs, it will be along this flat path. PVC insulation seems to work fine at 50 ohms and low voltage. The ends of the dipole are typically thousands of ohms (much higher voltage). I have not tested these to see how they weather. If the shiny surface is pitted, water accumulates, and carbon tracking can occur. I know the ceramic ones work, even at full legal limit. If you find some of the longer surplus ceramic end insulators at a swap meet, buy them, and be assured of maximum performance.
 BUILD YOUR DIPOLE FROM QUALITY WIRE
I do not understand why people study for an exam and learn the formulas for antenna lengths, obtain SWR bridges or antenna analyzers, and still buy pre cut commercial dipoles. The purveyors of these antennas have to compete on price, so they often take short cuts. In the case of commercial multiband fan dipoles, nearly all have separator insulators that are too close spaced. This is true of the Jetstream and Alpha Delta. The consequence is increased interaction between the antennas narrows SWR band width on the upper frequencies. The advantage of the Jetstream is that you choose the bands you want to combine and build the antenna yourself; it is a KIT. Wise choice of which bands to combine will improve your results, and flexibility of the KIT concept allows you to take it apart and experiment to improve it. The wire supplied with the Jetstream is very good quality, and worth the expense. I have a separate article on multiband dipoles that uses those components as a starting point. I have not tried an Alpha Delta multiband dipole. The center insulator appears to be the one discussed in this article; I do not know if the lightning protection is replaceable or removeable. The center insulator is heavy and requires support in the center of the antenna. The Alpha Delta is ordered assembled with the bands chosen, and you can trim the ends to get resonance. The manufacturers make the assumption that the average ham does not know how to operate a calculator, a 100 foot tape measure and wire cutters; I hope they are wrong. Do not be afraid to use the design tools you learned from your club's radio instructor who prepared you for your exam. Commercial dipole antennas do not possess a secret blessing from some mysterious incantation that imparts 8 dB of extra gain in all directions over your own home brew antenna! (Hint, drum sounding in background: The secret incantation is: "O-wah Ta-nu Bi-yam" - chant it at increasing speed until you reach enlightenment, grasshopper.)
For the frequencies below 14 MHz, I use #12 or #14 THHN stranded wire in spools from LOWES. When pruning to resonance, I find the actual antenna comes out about 5% shorter than the formula. While there are some web sites that dispute this 5% factor, I have found it to be in the ball park by empirical observation. Keep in mind that the classical dipole antenna formula includes a factor, K, to account for velocity factor of BARE wire, determined by empirical data. This extra 5% is due to the velocity factor caused by the insulation, and a slight modification of the factor K. Also be aware that when building higher frequency beams from aluminum pipe, the factor K is different from small bare wire due to the diameter of the aluminum pipe. I will not bother you with your freshman physics professor with the leather patches on the elbows of his jacket, lab courses with Leyden jars. Remember he taught you that current flows the wrong direction; we all later learned in the electronics courses that began with 300 or 400 that it goes from plus to minus. Anyway, the insulation holds up well and prevents some corrosion. Even the wireman and DX Engineering are selling insulated wire these days. Be sure to cut off any excess from the ends of the antenna. Wrapping insulated wire back on itself for six inches or more at the end insulator can give some confusing results. Or go first class with this:
https://www.dxengineering.com/search/product-line/dx-engineering-premium-antenna-wire/wire-type/stranded/insulation-type/relaxed-pvc.
For higher frequencies, I use bare stranded copper wire. The antenna comes out closer to the calculated length. At higher frequencies, the length is easier to adjust. You can wrap the uninsulated end back on itself temporarily while tuning the antenna for lowest SWR, but cut off the excess when you are finished. The Jetstream multiband dipole KIT has excellent bare wire, which seems to hold up very well. The wireman carries a big assortment of copper and copper coated steel wire (copperweld for no stretch maximum strength).
https://thewireman.com/antennap.html
BUILD AND ADJUST YOUR DIPOLE TO CORRECT LENGTH FOR BEST SWR IN JUST ONE HOISTING
Click here to use the Calculators for Making your Own Wire Antenna written by Don, AC2RS.
The following procedure works for full wave loops, half wave dipoles, and quarter wave verticals:
- First, if you haven't already done so, cut your own dipole wires to slightly longer than that required by the lowest frequency in the band of interest using the first calculator on Don's page.
- Then, measure the actual frequency of minimum SWR (and zero reactance if you have an MFJ antenna analyzer).
- Plug those numbers into the second calculator to find out how much to adjust the length.
- Let your antenna down JUST ONCE (if it was up yet), adjust the length, put it (back) up, and you are done!
The third calculator on Don's page is a tool for determining correct length of a quarter wave transmission line of 75 ohm coax (RG-11/U from DX Engineering) to transform the 150 ohm nominal full wave loop impedance to 50 ohms for tunerless fun. This tool can also be used to calculate the right length of 75 ohm line to transform the third harmonic operation of a 40 meter dipole for 15 meters. The short length of match section in that case would have minimal effect on the 40 meter operation. I have done this, and it works! The hats or stubs added at approximately 11 feet out from feedpoint can also shift the resonance lower in the 15 meter band without influencing the 40 meter resonance.
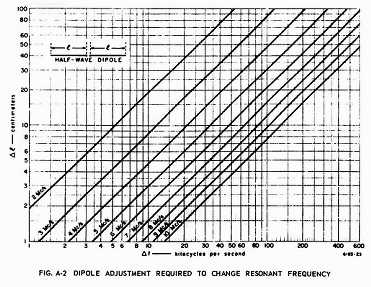
Back in the day, the miltary had really good tech schools. A soldier in the field did not have time or calculators and had to get the job done. Here is a chart from a Field Guide to antennas prepared by Stanford University for Project
Agile. It even has a page in it for modding the BC-610. Basic antenna theory has not changed a bit from that time, other than having better computer modeling. If you want to get your station up and running with an effective antenna, use this chart to prune for best SWR, on just one try. Later, I may add nomograph lines for 14, 18, 21, and 28 MHz. Click on the chart to enlarge it. Print it out from there if you find it useful. For now, this chart is same as the original published at:
http://www.dtic.mil/get-tr-doc/pdf?AD=AD0684938.
Or if you would rather use a calculator, Don AC2RS has developed a tool for pruning dipoles in one step.
See it at: /Projects/Antennas/AntennaCalc.html.
BUILD YOUR DIPOLE USING QUALITY COAX FEED LINE
Do not cut corners on cheap coax. RG-174 is incredibly tiny, and can be used in low power stealth antennas, but beware of its loss. Do not use it unless there is no alternative. Even for QRP use, you do not want to waste a single milliwatt of your precious RF. RG-58/U is small and inexpensive, but its losses at 20 meters and up disqualify it from my systems. RG-8X is only slightly larger, very flexible and relatively low loss. It is a good value for stations in the 100 watt class. But be aware that it must not be tightly bent, since the foam dielectric will allow the possibility of short circuits due to stress. I prefer to use the larger style similar to RG-8/U, since it is the lowest loss and handles high SWR and high power. Here is one high performance version that is very affordable:
https://www.jefatech.com/products/ll400.
BUILD YOUR DIPOLE FEED LINE USING QUALITY PL-259 CONNECTORS
Do not use crimp on or screw on style PL-259 connectors outdoors. Use only the style that must be soldered. Do not use cheap phenolic insulated PL-259 connectors. Get TEFLON insulated PL-259s to avoid failure. They will stand the test of time. Get them here:
https://www.dxengineering.com/parts/dxe-pl259.
Correctly installing a PL-259 connector takes some care and experience. I may write a how to article for this later. If you do install coax connectors, be sure to use a high power soldering gun, 100 watts or more; a 30 watt PC board soldering iron will not do the job. I use a propane torch to quickly solder the pre tinned shield to the body of the connector. Work quickly to avoid damage to the coax or connector insulation.
IF YOU USE PRE MADE COAX CABLES, BUY QUALITY MADE CABLES AND CONNECTORS FROM REPUTABLE SUPPLIERS
I would totally understand why a new ham would purchase a cable assembly with the connectors on both ends of a quality coax cable. There is no need to apologize for choosing to spend just a little more on a pre built coax cable for better reliability. I bought some shorter pre terminated patch cables when I bought my new amplifier, since my old cables and switches would not handle the power. Just be sure the cables you buy use the best quality connectors and coax. Buy quality now, or you will spend more money later replacing junk. Do not damage your nice transceiver with cheap cable that has intermittent connections or goes shorted. I made this mistake - only once.
AVOID CHEAP ANTENNA SWITCHES
If you have more than one antenna, or want to switch between an antenna and a dummy load, you may want a switch. Do not use cheap antenna switches. I had an older Heathkit antenna switch that had worn contacts. I burned out the finals in my older radio due to my neglect in replacing it earlier. These are standard ceramic switches that lose their plating as they wear out. Most of the antenna tuners with internal antenna switches use the same switch wafers that wear out. Avoid cheap used hamfest antenna switches, or it may cost you big time. Buy new and high quality. If you have intermittent reception with any antenna switch, check it out with an ohm meter and replace it before you have bigger troubles. See:
http://pdf.textfiles.com/manuals/SCANNERS-F-R/Heathkit-HD-1234.pdf.
I like the construction of Alpha Delta switches. There are imitators like the MFJ and Jetstream. I have disassembled these to inspect the interior construction quality and clean and adjust the contacts.
http://www.wirelessgirl.net/Projects/Antennas/ADswitchRepair.html
I do remove the arc plugs from the Alpha Delta switches, since they can fire when using high power and SWR of more than 2:1. The arc plug is a neat idea, but in my opinion, you should get a more effective means of lightning protection and never operate your radio in a storm. Solid state amplifiers do not enjoy working into an arc. But removing the plug can eliminate some lightning protection. Setting the switch to ground all antennas and disconnecting the coax that runs to the radio is much better. If we get a severe weather alert, I go outside and disconnect the antennas there. I have a grounding rod, with DX engineering brackets for bulkhead SO-239 connectors. This joins the antenna coax to the coax that goes to the house. I put a bucket upside down over the grounding assembly to keep the water out, and seal the upper part with duct seal to the antenna coax. I disconnect the house feedlines of 40 foot length and roll them up near the house during the storm. If I go on a trip during the summer, I also disconnect the antennas before leaving. But there is a lot of thought that must go into station grounding and lightning protection. I recommend you buy the ARRL book on lightning and grounding. The subject is too complex to go in to here. In any event, the Alpha Delta switch has delivered good performance at my station, and I highly recommend you spend the extra ten bucks for the better quality and longevity you will enjoy. See:
https://www.dxengineering.com/parts/alf-delta-4b.
ANTENNA SUPPORTS FOR DIPOLES
I am fortunate to have trees tall enough to use for antenna supports. I use good quality metal pulleys from a farm supply store to raise and lower the antennas for tuning and repair. Due to the squirrel population, I cannot use rope because they gnaw through it. Dress the coax away from tree trunks as it exits the antenna or they will chew the outer jacket and ruin the coax. I use the same THHN wire for the support via the pulley because the squirrels cannot chew through it. In the vertical orientation, the pulley wire used to raise and lower the antenna does not absorb significant energy from the horizontal antenna. If you do not have trees, these supports can be used for either permanent, portable, or temporary antennas:
http://www.mfjenterprises.com/Categories.php?sub=0&ref=19.
The antenna(s) can be used as guys for the supports, if installed as inverted V antennas in a multi band scheme.
ENJOY LEARNING FROM BUILDING YOUR OWN DIPOLE ANTENNAS
There are many different kinds of dipole antennas. They differ only in the feed methods. Each has their own advantages. I favor a simple resonant one band dipole or inverted V. On this web page, there are construction articles for multi band dipole antennas. Many people favor the G5RV, but it has its disadvantages. I personally do not like open wire feed line, for reasons discussed in my other articles. While some criticize the Carolina Windom, I tried one out 2017 Field Day and got pretty good results; it uses a balun, and it is NOT a balanced antenna system. Be aware some versions of the Carolina Windom do not cover all bands. Both of these dipole variations claim to have some gain (in some direction) on their harmonics. Be sure to use a great circle map to find true compass headings to hang this type of dipole so that it favors the direction you intend. In the New England states, a non rotatable antenna installation that favors northeast and southwest covers the most likely areas you will make contacts. End fed Zepp antennas were popular among Novice hams back when I was first licensed in 1959; now they have fallen out of favor since we understand common mode current, but Zepps are still essentially dipoles fed in a different fashion. I specifically recommend you avoid any "broad band dipoles" containing resistors, such as the T2FD. They tell you not to paint the resistor because it gets hot. You want your RF to produce a signal, not heat. See:
https://en.wikipedia.org/wiki/T2FD_antenna.
I suggest you use a dipole for your first antenna rather than a vertical. When I was a Novice OP in 1959, I used a 90 foot long end fed wire Marconi antenna with a series capacitor for 80 and 40 for a while, but you need a ground system to get good results. The bent over horizontal section was a big improvement over my shortened Gotham vertical. Any end fed wire or vertical antenna depends on ground, even the popular half wave style commercial antennas sold these days. The ground provides reflection for the low angle radiation claimed, and if not erected at an effective height, a vertical will not give you good performance. Just because it is made from expensive aluminum pipe and fed with a "magic box" that matches it for lower SWR does not make it worth hundreds of dollars or empower it with magical gain properties. I struggled with a Gotham vertical until a friend got me hooked on dipoles. W8JI tells the truth about the Gotham and its cousins. See:
https://www.w8ji.com/gotham.htm.
Get some wire and try building a dipole before you spend that kind of money. You know how to do it. It was on the exam. You will be pleasantly surprised how well you do!
If after reading these pages, you find you do not have enough space for a full size dipole, try one with traps, which reduce the length. You will lose some band width and hopefully not too much efficiency loss, but it is better to have SOME antenna rather than NO antenna. It is best you purchase a trap dipole commercially in that case. You can even obtain a really compact antenna like the cobweb:
http://www.mfjenterprises.com/Product.php?productid=MFJ-1835.
ISOTROPIC TO DIPOLE REFERENCE CONVERSION: THE BOVINE FECAL MATTER DETECTOR FOR ANTENNA GAIN ADVERTISING! Don't get sucker punched by the gain figure of "Up to 5 dBi gain will allow you to work DX easily -- even on QRP." There is a trade off for wrapping a dipole back on itself to reduce its size. A full sized dipole has more than 8 dBi gain (taking ground reflection into account), or gain over a non existent theoretical isotropic antenna that radiates equally in all directions and has zero dBi (referenced dB to isotropic). Keep in mind that 5 dBi of the cobweb antenna is only half an S unit down from a full size dipole's 8 dBi. This is potentially a good solution to your problem, if you have a small lot. Could you homebrew a clone of the cobweb? Maybe. Would it be worth your effort? Only you can decide. If this is your first antenna, I would suggest you give the MFJ a try.
Later on, you may want a beam. A beam will give you about 1.5 S Units (9 dBd or 17 dBi) more than a dipole (8dBi), which tells you why the dipole works so well, especially compared to most verticals of today. The hex beam has made a well earned reputation for punching well above its weight class, in a small package. While there are trade offs for making it compact, it seems to get the job done. There are complete kits for hex beams. A friend of mine made DXCC QRP using one. Just shop for best quality, so it stands up to storm winds. After using a dipole system for a while, if you have the space and money for a full sized beam and tower, go for it. Be sure to get professional help with the installation, people get killed climbing towers without proper safety equipment. You can also build your own 15 or 10 meter Yagi-Uda style beam, with common materials. We used to do it back in the 50s and 60s as Novice Ops. You can do it too! Some good beam references:
Please take this in the spirit in which it is offered: not the grumblings of an old curmudgeon, but the encouragement to "exper"-iment and gain "exper"-ience that gives you the confidence to build your own antennas from high quality available raw materials and learn something useful in the process. It may prove valuable if you have to improvise a radio set up during an emergency situation or on Field Day. Start building and learning with antennas, then station accessories, and in time you will become an expert. Enjoy your hobby, and expand your mind.
DISCLAIMER: This website does not do paid advertising, nor does it receive financial support of any kind from anyone. These are my personal observations based on experience with reliable suppliers. Shop around, you may find better deals. Also, buy from dealers who visit your hamfest with quality materials. They support your local swap meet, and often have special pricing.
SAFETY WARNING: KEEP ALL ANTENNAS AWAY FROM POWER LINES. DO NOT POSITION ANTENNAS SO THAT IF THEY FALL, THEY WILL COME INTO CONTACT WITH POWER LINES. DO NOT POSITION ANTENNAS SO THAT IF POWER LINES FALL, THEY WILL COME INTO CONTACT WITH ANTENNAS. OBSERVE COMMON SENSE SAFETY PRECAUTIONS TO AVOID LOSS OF LIFE OR EQUIPMENT DAMAGE. OBTAIN AND APPLY THE PRINCIPLES IN THE ARRL BOOK ON GROUNDING AND LIGHTNING PROTECTION.
|